Warm Autumnal Tutorial

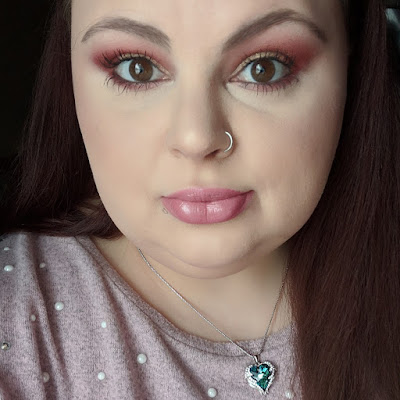
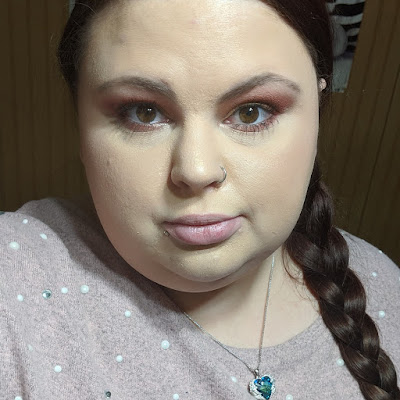
Hello everyone and welcome back to my blog. As it's now the end of October and we're really into the autumnal season, it's time for me to do all of my favorite fall makeup looks! This is my favorite time of year! Let's just hope and pray I'm not covered in hives all fall and winter this year, like I was last year ugh. Let's get into this look!

Starting out this look I did my base, all of the products will be down below! I primed my eyelids with foundation for this look. I've been doing that a lot lately and it's been holding up all day so much better than the eye primer I was using. For this look, I used two of the Jaclyn Hill Vault palettes!

Palettes Used:
Jaclyn Hill Vault: Bling Boss
Shades: Bling Bling, Hush Hush, Spark, Rockstar
Jaclyn Hill Vault: Ring The Alarm
Shades: Lolli, Siren


On a big fluffy brush I took Hush Hush and blew it out in the crease to start out a smooth base for the rest of the crease colors. On a smaller tapered natural fiber brush I took Spark and Rockstar and blended them through the crease, taking it almost all the way to the inner corner. To darken the outer corner, I picked up Siren and some Spark and kept them pretty tight in the corner and a little in the crease to help blend everything. I cleaned off my big fluffy brush and buffed the edges of everything out to create more of a hazy blended look. On the lid I used my fingers to pat on and blend out Lolli in the edge of the outer crease towards the inner corner, the I took Bling Bling and patted it from the inner corner, about half way in. I was in a rush to a wedding this day and completely forgot to put anything on my bottom lash line! I would of used some of Spark and a little of Bling Bling to brighten the year duct.


These are some of my favorite colors to work with! I'm kind of spooked by cool tones, but warm tones are my favorite! I have green rings an a weird green spot in my eyes and warm tones really help the green pop! I know I haven't been blogging much, I was going through a lot of things inside myself. Self hatred and feeling not good enough or like I'm not going to go anywhere with my career I'm trying to build. I'm doing better about all the self loathing, and I'm going to be putting more effort into myself and my website! I post a lot more on Instagram if you want to keep updated! My Instagram is Luluslifebeauty!


Products used:
Face:
Colourpop No Filter / Morphe (mixed 50/50)
Morphe Concealer
Makeup Revolution, Baking Powder, Translucent
Elf Contour Palette
L.a. Color Blush Brick, Glow
Elf Highlight kit (golden yellow color)
Essence, Pure Nude, Spacelighter (iridescent pink shift)

Eyes:
Jaclyn Hill, Bling Boss
Jaclyn Hill, Ring The Alarm
Essence Waterproof Eyeliner
Maybelline Greatlash Waterproof Mascara
Drugstore Brown / Black Brow Pencil

Lips: 
J.Cat Beauty Lipfinity Kiss-Proof Liquid Lip, Champagne Buzz

Brushes / Tools: 
Real Techniques Foundation Sponge
SIXPLUS 15pc Brush Set
BH Cosmetics, Royal Affair Brush Set

Find me elsewhere:

Sweat proof makeup!

Hello everyone and welcome back. I haven't been here in a while but I'm back and have been working on testing certain makeup items and application techniques to work with sweating! I am someone who deals with sweating a lot. It's taken many years to figure out how to do a full face of makeup and have it look good all day. That's through sweating and dealing with an oily t-zone. I've tried a lot of foundations, concealers and powders and found a trick that works with any that you own! Let's get into it!


For foundations I've used,
Maybelline matte and poreless, 
Revlon Colorstay (combo oily), 
Colourpop No filter 
Morphe foundation 
Dermacol.
It's worked with all of them, just better with some more than others! 


For concealers I've used,
Morphe's, 
Colourpop No filter,
Elf 16hr camo concealer, 
Makeup Revolution's concealer and the 
Ulta full-coverage concealer.


Whenever I do my makeup anymore, I buff in my foundation with a flat top brush. Right now I'm using the Bh Cosmetics foundation brush from the royal affair set! It's super soft and dense! The best thing to do is to buff in a light amount of a medium to full coverage foundation. You don't want to put a bunch in because you'll end up looking cakey! A thin amount of product looks more skin like and all around nicer. For concealer, I always use a Real Techniques alone and a small amount of concealer. 

My favorite foundations right now are a half and half mix of the Morphe foundation and the Colourpop No Filter foundation. My Morphe is too dark and the colourpop is too light, So I mix them and they end up looking so good together. They're both matte foundations, so the end up not causing any weird issues being mixed. The Morphe one is so long wearing and sweat resistant to an extent. To make things last so much longer, I put setting powder on my forehead, around my nose and chin. It's basically like baking, but I don't use a ton of powder. The rest of my face is lightly dusted with any extra powder.


I know this is not revolutionary, But I've been asked a lot how I keep my makeup in place all day. Through sweating, heat, running errands and anything you can think of. Honestly, the Morphe foundation mixed with colourpop's and set with the Makeup Revolution Translucent Baking Powder is magic. I think it might be some kind of which craft. Remember, Know your skin type! If your dry, these tips will not work for you. You will need a dewy foundation and maybe use the lightest amount of powder possible!

Pre-Makeup prep!
I always make sure I scrub and moisturize my face! I use an antibacterial hand soap, It works best for my acne prone skin. I then air dry my face and lather on Nivea Cream, It's super thick and my skin loves it. I've recently started using (recently as in like 5 months ago) the Makeup Revolution baking Oil. I love it. My face is so soft and my natural oil production isn't crazy like it use to be. It's really helped balance out my skin. When I use to do my makeup, my nose makeup would slide off and look horrendous after like an hour. Now it looks so much better with my natural oils being under control. I hope this has helped some of you out! Let me know if you try any of these tips and how they work out for you. DM me on Instagram if you have any questions! I'd love to help you out! 

Instagram: LulusLifeBeauty
Twitter: LulusLifeBeauty

Xoxo Lulu

Purple Royalty Smokey Eye - Jaclyn Hill Palette


Purple Royalty Smokey Eye Jaclyn Hill Palette

Hello everyone and welcome back to my website! Today is another tutorial using the original Jaclyn Hill palette! I've been wanting to dive into Royalty and Twerk, so that's exactly what I did. I think this tutorial is pretty easy to follow a long with. I used minimal colors and tried making sure it wasn't hard. Now I am pretty annoyed that I could not get good photo's of this eye look, Either it was too dark and wasn't showing the color's in the eyeshadow, or everything was super washed out and making the black eyeshadow look kind of gray. So we went with the photo's that were too bright, because at least you can see the colors I put on my lid!


Starting out this look I primed my lids using my Wet n Wild Photofocus Eyeshadow Primer and left it tacky to help the eye shadows stick and be a little more pigmented. These shadows don’t need any help with pigmentation but it also helps with the longevity of the eyeshadow on your eyes. Picking up the shade Pukey on a big blending brush I buffed it all over the outer corner, about two thirds of the way in. Next up I used a smaller / medium blending brush and the shade Central Park and blended it tighter in the crease, focusing on the outer third of the lid. Taking a flat shader brush, I picked up Abyss and created the outer corner shape while also just packing on a bunch of the black eyeshadow. I then dragged the black under my bottom lash line and faded it into some of the shade Pukey. For the lid, I didn't bother cutting the crease, I picked up Royalty on my finger and swiped it across my lid two thirds of the way in. On the center on the lid, again on my finger, I picked up Twerk and patted it on. Mixing Royalty with Twerk was such a good decision. It created almost a duo chrome look and I'm obsessed! On the brow bone and inner corner, I patted on Beam with a smaller pencil brush!

Thank you all so much for stopping by and checking out this tutorial. As you can see, this is a pretty simple look. It turned out so pretty, I just wish I had better photos of the look. I love a dark smoky look! It makes the green in my eyes pop more. If you enjoyed this tutorial, please feel free to share it and check out my social medias. Especially my Instagram, I post more looks over there! LulusLifeBeauty on Instagram, I recently hit 1k and I'm trying to hit 5k by May 5th, Which is my birthday! Please help me make this goal a reality!
Xoxo Lulu


Products used today. 
Eyes: 
Wet n Wild Photofocus Eye Primer
Morphe x Jaclyn Hill Palette
Essence Kajal Eye Pencil, Black
Broadway Beauty eyebrow pencil, brown / black
Maybelline Great Lash, Clear, Brows
Maybelline Great Lash, Black, Waterproof

Face: 
(Foundations mixed 1:1)
Revlon Colorstay Foundation, 200 Nude
Maybelline Matte & Poreless, 110 Porcelain
Morphe Fluidity Full-Coverage Concealer, C1.25
Makeup Revolution, Baking Powder, Translucent
Elf Contour Palette
Maybelline, Fit Me Blush, Mauve

Highlight: 
E.L.F. Cosmetics Highlighting set (It's a light golden yellow, had no name.)

Lips:
Maybelline; Super Stay; Matte Ink; Loyalist

Brushes / Tools:
Real Techniques Foundation Sponge
SIXPLUS 15pc Brush Set
BH Cosmetics, Royal Affair Brush Set

Find me elsewhere:

Romantic Mauve - Jaclyn Hill Bling Boss Palette


Jaclyn Hill Bling Boss Palette

Hello everyone and welcome back to my website! Today I played in the Jaclyn Hill Bling Boss palette from her Vault collection! The color story is right up my alley! Berries, Pinks, Purples and Mauve's are my literal comfort zone! I don't think I'm going to do much of a review of this collection, because everyone has reviewed the Jaclyn Hill Vault Collection. We all know the palettes are buttery, pigmented and beautiful. There's four palettes and they each have their own vibe, tone and theme! These palettes are going to push my boundaries. I hate stepping out of my comfort zone, but I'm going to be doing that very soon. Kind of funny story, I originally went in with the Dark Magic palette the evening I did this makeup look. I was going in with the greens, trying to do a fun St. Patrick's day look, But I got real spooked and was scared to go to iHop with green eyeshadow on. I mean, can anyone else relate? I love bright colors, But i'm scared of blues and greens... Alright, let's get into the Jaclyn Hill Bling Boss Tutorial. By the way, There are so many looks you can do with this palette, this is just my first time playing in the palette!


To start out this eye look, I primed my eyelids with the Wet n Wild Photofocus eyeshadow primer and set it with the Makeup Revolution Baking Powder in Translucent. On a nice and fluffy blending brush I picked up the shade Hush Hush and blew it out all over the lid, inner corner to outer corner and to the brow bone. I absolutely love a good mauve eyeshadow! On a more normal size blending brush I picked up Rockstar and ran it through the crease and outer third of the lid, trying to keep the lid a little less smoky, but I got carried away! I wanted to darken up the outer crease a little more so I picked up a tiny bit of Mystic and really focused it in the outer edge of the lid. I brought it about a third of the way on the bottom lash line. For the pop of beautiful shimmer on the lid, I picked up Bling Bling on a flat shader brush with a little spray to intensify the metallic-ness of the pink. On the brow bone and inner corner, I cheated a little and used the shade VIP from the Armed & Gorgeous palette. Such a beautiful frosty white, I imagine this color being insanely blinding if you use it with a setting spray!


That is it for this Jaclyn Hill Bling Boss Palette tutorial, It's such a simple look that's also super pretty. I see this eyeshadow look being a soft romantic vibe. I just crave these kinds of looks, no matter the occasion, the day or the time, I know a look like this will have me feeling confident. Also I don't know if it's just me but pinks, mauve's and burgundy shades seem to make the green in my eyes pop a lot more. My eyes tend to look more brown, unless I wear certain eyeshadow colors! Thank you so much for checking out this tutorial. I'm sorry for always being a rambley mess! 


Follow me on Instagram! @LulusLifeBeauty


Products used today. 
Eyes: 
Wet n Wild Photofocus Eye Primer
Morphe x Jaclyn Hill Bling Boss Palette
Essence Kajal Eye Pencil, Black
Broadway Beauty eyebrow pencil, brown / black
Maybelline Great Lash, Clear, Brows
Maybelline Great Lash, Black, Waterproof

Face: 
(Foundations mixed 1:1)
Revlon Colorstay Foundation, 200 Nude
Maybelline Matte & Poreless, 110 Porcelain
Morphe Fluidity Full-Coverage Concealer, C1.25
Makeup Revolution, Baking Powder, Translucent
Elf Contour Palette
Maybelline, Fit Me Blush, Mauve

Highlight: 
E.L.F. Cosmetics Highlighting set (It's a light golden yellow, had no name.)

Lips:
Maybelline; Super Stay; Matte Ink; Loyalist

Brushes / Tools:
Real Techniques Foundation Sponge
SIXPLUS 15pc Brush Set
BH Cosmetics, Royal Affair Brush Set

Find me elsewhere:
Youtube: https://www.youtube.com/user/LINDAxHELLA
Twitter: https://twitter.com/Luluslife_blog
Instagram: https://www.instagram.com/LulusLifeBeauty/
Facebook: https://www.facebook.com/Lulus-Life-Blog
Pinterest: https://www.pinterest.com/lindaxhella/pins/
Tumblr: http://lindaxwoods.tumblr.com/

Spring Vibes - Jaclyn Hill Palette Tutorial

Jaclyn Hill Palette Tutorial - Overview


Hello everyone and welcome back to my website. Today I have the original Jaclyn Hill Palette! I know it's going to be two years old in June or July, But I finally just got it. It's not for a lack of wanting it or anything like that. I was never able to afford it till now. I also got her vault collection and I'll have tutorials for each of those as well. I'm so excited for all of the tutorials I'll have going up over the next month or so... I already I one of those done, I just have to write it... After I'm done with this post! The look I did with this palette, I know I know, It's kind of underwhelming! I was so panicked by all of  the beautiful colors that I just didn't know what to do or where to begin! So I went with a warm toned kind of smokey eye with a super shimmery baby pink lid color. Lets get started boi's!
Starting out this eye look, I primed my lids with the Wet n Wild Photofocus Eyeshadow Primer, and set it with the Makeup Revolution Baking Powder in Translucent. I decided to set my lid with this look because I wanted to see how pigmented the shadows were without a sticky base. Going into the Jaclyn Hill Palette I started off with the shade Pukey and brought it almost all the way into the inner corner on a bigger fluffy brush. I went in twice with it, bring it up a little bit higher for more of a blown out look. To deepen up the crease I tapped into Roxanne and kept it more in the outer third, blending it lower and keeping it focused in the outer corner. I ran Pukey and Roxanne lightly under the lash line, blowing Pukey out a little more, keeping Roxanne tighter to prevent it from looking too dark. On the lid I took a flat shader brush and some spray and picked up the shade Sissy, and put it all over two thirds of my lid, slightly blending it into the outer third. I also brought it on the lower lashline about a third of the way in. On the inner corner and brow bone I used the shade Beam.


Thank you all so much for stopping by, please feel free to share this post! Just a little wrap up here, I love this palette. Oh my god, the mattes are soft, creamy, blendable and pigmented! The shimmers are so buttery and pigmented. I can't wait to play in the Jaclyn Hill palette again, But I also have other new palettes and I want to try all of them out more. My next look with this palette is going to involve Royalty and Twerk! I don't know how I'm going to do it, but i'm using both of them together somehow! There are endless color combinations and looks that can be done with it. I'm so beyond happy the Jaclyn Hill palette wasn't sold for a limited time!
Products used today.
Eyes: 

Wet n Wild Photofocus Eye Primer
Morphe x Jaclyn Hill Palette
Essence Kajal Eye Pencil, Black
Broadway Beauty eyebrow pencil, brown / black
Maybelline Great Lash, Clear, Brows
Maybelline Great Lash, Black, Waterproof

Face: 
Morphe Fluidity Full-Coverage Foundation, F1.50
Morphe Fluidity Full-Coverage Concealer, C1.25
Makeup Revolution, Baking Powder, Translucent
Elf Contour Palette
Maybelline, Fit Me Blush, Mauve

Highlight: 
E.L.F. Cosmetics Highlighting set (It's a light golden yellow, had no name.)
Maybelline Master Chrome, Molten Gold

Lips: 
Maybelline Color Sensational Lipstick, Romantic Rose

Brushes / Tools:
Real Techniques Foundation Sponge
BH Cosmetics, Royal Affair Brush Set
SIXPLUS 15pc Brush set

Find me elsewhere:
Youtube: https://www.youtube.com/user/LINDAxHELLA
Twitter: https://twitter.com/Luluslife_blog
Instagram: https://www.instagram.com/LulusLifeBeauty/
Facebook: https://www.facebook.com/Lulus-Life-Blog
Pinterest: https://www.pinterest.com/lindaxhella/pins/
Tumblr: http://lindaxwoods.tumblr.com/

Golden Smokey - Morphe Bronze Goals 35G Palette


Morphe Bronze Goals

Tutorial & Review


Hello everyone and welcome back to my website! Today I have a tutorial and review using the new Morphe Bronze Goals 35G palette! I bought this palette in Ulta on a whim, I hadn’t heard anything about it, nor had I even heard Morphe dropped a new palette! I was so sucked in by all of the browns, bronze, gold’s, coppers and pops of burgundy shades. I just had to pick it up. This palette is pretty dark as well. There aren’t many lighter shades. So if you like to set your lid before applying eyeshadow, you’ll have to use either your setting powder, or a shade from another palette that matches your skin tone. That’s the one down side I’ve noticed off the bat. Let's get into the tutorial first, it's pretty simple!


Tutorial Using Morphe Bronze Goals 35G Palette:
Starting out this tutorial, I primed my eye lids with my Wet n Wild Photofocus primer and set it with the Makeup Revolution Translucent Baking Powder. Going in with the Morphe Bronze Goals 35G Palette, on a bigger blending brush, I took the shade Sandy and brought it from the outer corner all the way through the crease, building up the warmth. On the same brush, I picked up Nekked and Equator and buffed them into more of the outer corner, bring it in the crease about a third of the way. Going into the copper shade, Summer Vibes, I picked it up on my finger and swiped it across the lid about two thirds of the way over. I felt it was looking kind of dark, so I picked up the shade Sol on a finger and patted it in the middle of the lid, making sure to blend the edges as I went. On the bottom lash line, I used a combination of Sandy & Nekked and softly blended them out, using Glare on the inner third, inner corner and brow bone. As you can see, The colors are beautiful! I do have a few things to say about the formulas on some of them, so lets get into the review of the palette.


Review of Morphe Bronze Goals 35G Palette:
Let's talk about the formula of the matte shades in the Morphe Bronze Goals 35G Palette! I went through and swatched all of the shades and checked how they felt and the opacity of each of them. The mattes are pigmented, smooth and just beautiful browns. The black is so pigmented and beautiful, I was a little shocked at how good it was, to be honest. There's a really good mix of lighter and darker browns, as well as cool and warm tones. 

Now on to the shimmer shades in the Morphe Bronze Goals 35G Palette! I had some trouble getting pay off on a lot of them. It seems like their formulation is a little dry and definitely could of used more oils in them. They work beautiful if you use your finger, I did have some trouble getting pay off with a wet synthetic brush. Using a wet natural fiber brush on the other hand had really good pay off, again, when wet. They really don't pick up well on a dry brush. 

Overall my final thoughts on the Morphe Bronze Goals 35G Palette, despite the issues with the shimmer shades, I still highly recommend this palette. The mattes are creamy and blendable. The shimmers go on beautiful with a finger, as long as I can make them work without it being a fight, I honestly don't mind. Keep that into consideration. If that's something that you don't like to deal with, then maybe skip this on. But the colors alone make the palette 100% worth it. Not to mention this palette is 35 shades for only $25.00!

Thank you all so much for stopping by to check out this tutorial and review on the Morphe Bronze Goals 35G Palette! If you want to see me use any shades particularly, let me know! This palette is so pretty and I can't wait to play in it next! Should I go cool or warm? Bronze, Gold or Burgundy or Pinkish. As always I will have everything I used in the tutorial, listed below! Follow me on Instagram! LulusLifeBeauty ;)

Vic Cosmetics
Here is the makeup look with three different lip colors. In these pictures, I'm demoing 3 sample lip colors I received from my daughter who works for the up and coming company VIC Cosmetics! The mattes are super pigmented, creamy and thin. They are not sticky or patchy and last a long time! The two glosses are a plumping kind of gloss and I love them! The pink one has a gold shimmer and the wine colored one has no shimmer and does stain which I Love!!! I'm so scared to wear bold colors on my lips but this is a color i'll be wearing a lot more often. I'm going to have to purchase a full size plumping gloss asap! I'm going to leave my daughters link so you can order from her! They are a new company and coming out with some amazing stuff! Definitely check out their new mascara! 


Products used today.
Eyes: 

Wet n Wild Photofocus Eye Primer
Morphe Bronze Goals 35G Palette
Essence Kajal Eye Pencil, Black
Broadway Beauty eyebrow pencil, brown / black
Maybelline Great Lash, Clear, Brows
Maybelline Great Lash, Black, Waterproof

Face: 
(Foundations mixed 1:1)
Revlon Colorstay Foundation, 200 Nude
Maybelline Matte & Poreless, 110 Porcelain
Morphe Fluidity Full-Coverage Concealer, C1.25
Makeup Revolution, Baking Powder, Translucent
Elf Contour Palette
Maybelline, Fit Me Blush, Mauve

Highlight: E.L.F. Cosmetics Highlighting set (It's a light golden yellow, had no name.)

Lips: Black Cherry Glaze [Stained from the plumping gloss]

Brushes / Tools:
Real Techniques Foundation Sponge
SIXPLUS 15pc Brush Set
BH Cosmetics, Royal Affair Brush Set

Find me elsewhere:
Youtube: https://www.youtube.com/user/LINDAxHELLA
Twitter: https://twitter.com/Luluslife_blog
Instagram: https://www.instagram.com/LulusLifeBeauty/
Facebook: https://www.facebook.com/Lulus-Life-Blog
Pinterest: https://www.pinterest.com/lindaxhella/pins/
Tumblr: http://lindaxwoods.tumblr.com/

Colourpop No Filter Line Review

Hello everyone and welcome back to my website! Sorry I have been gone for over a week, I was doing some family stuff and had to take a short break from my website. I hated not being able to post, but I'm back and in full force! Today I have another review for you, I'm honestly really enjoying the reviews. Today I'm reviewing the ColourPop No Filter Foundation, Concealer and Translucent Setting Powder. I've gotten all three of them, and could not wait to use them! The hype behind them has been crazy. I'll get into everything I thought about the packaging, quality of the components. For the makeup products themselves I'm going to get into color matching, fragrance, longevity and general quality of the products.


Packaging: 
The exterior packaging is so cute on this set. It’s matte baby pink with diagonal white glossy stripes and silver embossed writing. This is seriously my aesthetic! The packaging of the products themselves is super simple and nice. The foundation is a clear glass bottle with a white plastic locking pump, white text and white stars, it’s so cute! The concealer is clear plastic, with a white handle, a flat paddle applicator tip, and silver text. The translucent setting powder is again clear with a white cap and silver text. The whole line is made super simple and clean looking. Not too crazy or confusing like I’ve seen on other packaging from different brands.


Products: 
The foundation, one thing I noticed is that it’s darker in the bottle than it is applied. I was scared I was about to look like a sheet of paper! Once the formula was set, it oxidized and got a little darker and looked how I thought it looked in the bottle. I was spooked for a good few minutes thinking I had the wrong shade. The formula is kind of on the more thin side. There is a light foundation scent, but it’s nothing strong or obnoxious. It literally just smells like a liquid foundation. For the pigmentation, I’ve heard people claim it being medium to full, I found it to be a mid-range medium coverage. I have acne spots, redness and scarring, I had to build up the foundation to cover them. Luckily it built up really nice and didn’t pull up or go patchy! 

The concealer is about the same as the foundation for scent, but I found it to be a higher medium coverage. It didn’t quite cover my dark circles, but I’ve never found anything that does. The shade in the tube is pretty accurate to what it looks like on. It blends out beautifully, although it is a touch too light. That’s my fault though lol. The consistency is a medium thickness and really creamy. 

The setting powder was pretty nice too. It’s a really finely milled powder that does on really smoothly. I did notice that although I got the shade Translucent, it did have a slight color to it. There was no flash back or anything like that, but it did lighten the shade of my foundation without adding any coverage. Which it isn’t supposed to, but I thought it was a good thing to mention! 

In conclusion, do I recommend these? Yes, honestly you can’t go wrong with these products especially for the price point. I did notice however that you should make sure you moisturize your skin before using the foundation, it did slightly cling to a dry patch near a break out. I hid it easily enough by patting in a little more of the foundation with my sponge and it seemed to hide it completely. I’ll have an unedited photo below for you to see it. My skin has texture and anything I wear will sit in my smile lines. It’s not the foundations fault. It’s literally just my face lol. By the way, I had the products on for over 8 hours, nothing broke up or went oily. I have combo skin with an oily t-zone.

Thank you all so much for stopping by and checking out this review! I love doing reviews so much. I have some new stuff I was to test out and give a wear test on. I can’t wait to get back into my beauty room! I’ve been in a funk, dealing with my anxiety and depression. I’m okay, but it’s not something that’ll ever go away and I’ve made my peace with that! I’ve also been helping babysit for my sister in law. This coming Friday I plan on going in there and playing in some new makeup! I can’t wait! 
Xoxo Lulu 

Products mentioned; 
Colourpop No Filter: 
- Foundation 
- Concealer 
- Translucent loose powder 

Products used in the look not mentioned; 
Wet n Wild photofocus eye primer 
James Charles x Morphe Palette 
L.A. GIRL, beauty brick blush palette 
Elf Contour kit 
Wet n Wild Megaglo Highlight, Precious Petals 
Mario Badescu, Rose herb spray 
Maybelline Great Lash Black Waterproof mascara 
Maybelline Great Lash Clear mascara, brows 
Broadway Colors Brow Pencil, Brown / Black 
J. Cat Beauty, Lipfinity Matte Lip Kissproof, Champagne Buzz

Brushes / Tools:
Real Techniques Foundation Sponge
BH Cosmetics, Royal Affair Brush Set

Find me elsewhere:
Youtube: https://www.youtube.com/user/LINDAxHELLA
Twitter: https://twitter.com/Luluslife_blog
Instagram: https://www.instagram.com/LulusLifeBeauty/
Facebook: https://www.facebook.com/Lulus-Life-Blog
Pinterest: https://www.pinterest.com/lindaxhella/pins/
Tumblr: http://lindaxwoods.tumblr.com/

Sunrise Eyes Tutorial (a year later)

Sunrise Eyes Tutorial

Sunrise Eyes Tutorial 

(a year later)

Hello everyone and welcome back to my website! Today's eyeshadow tutorial I have for you was one I was super excited to do! About a year ago I did a similar look using the BH Cosmetics Take Me Back to Brazil palette, which turned out beautiful. I decided to give it a second attempt, using the James Charles x Morphe palette! With the difference in quality of the eyeshadows and my skills improving, I thought it'd be a fun idea! I did do this look about two weeks ago and honestly forgot I had done it and realized it a few days ago. This look is so much more pigmented and blown out looking. It does look like it has less purple, but that's due to the lighting being a little weird and the purple being taken over by the red lol. In the regular selfie (not the close up) you can see more of the purple! Let's get into this boi's!


Sunrise Eyes Tutorial

Stating out the look, I primed my eyelids with the Wet n Wild Photofocus Eye Primer. A tacky base makes all the world of difference when using this palette! Concealer does this weird thing with the pigments and makes them go dark. Here in the image of the palette, I have all 6 shades I used circled and numbered to make things a little easier. On a large blending brush I picked up the shade Bee (1) and backed it into the outer corner and the buffed it out almost to the brow bone. Leave a little room so you have space to put a highlight shade. On a medium size blending brush, I picked up 518 & You're Kidding (2 and 3) and blew them out on the crease, making sure the yellow was still visible. On a flat shader brush I picked up Love That (4) and packed it all over the lid, avoiding the outer corner. On a smaller blending brush I blended the edges of Love That into the crease. I then used it to pick up the shade Escape (5) and darkened up the outer corner to bring in some more depth. On a pencil brush I picked up Ring Light (6) and put it on the brow bone and inner corner. Using the same pencil brush, I took Escape and Ring Light and put them on the bottom lash line, blending them into each other!


Sunrise Eyes Tutorial

That is the final look for the eyes! The rest of my face I did like I normally do, Which you can see me do in any of my YouTube videos! Linked below. I hope you love this look as much as I do. If you want to recreate this look, Tag me on social media! I'd love to see that yours turns out! Please remember to follow me on social media, I just hit 1k on Instagram and i'm so excited! 
Xoxo Lulu.


Products used today.
Eyes: 

Wet n Wild Photofocus Eye Primer
James Charles x Morphe palette
Essence Kajal Eye Pencil, Black
Broadway Beauty eyebrow pencil, brown / black
Maybelline Great Lash, Clear, Brows
Maybelline Great Lash, Black, Waterproof

Face: 
(Foundations mixed 1:1)
Revlon Colorstay Foundation, 200 Nude
Maybelline Matte & Poreless, 110 Porcelain
Makeup Revolution Concealer, C3
Makeup Revolution, Baking Powder, Lace
Elf Contour Palette
Ulta Beauty Blush, Tiger Lily / Sweet Pea duo

Highlight: Wet n Wild Megaglo, Precious Petals

Lips: Maybelline Color Sensational, Romantic Rose

Brushes / Tools:
Real Techniques Foundation Sponge
BH Cosmetics, Royal Affair Brush Set

Find me elsewhere:
Youtube: https://www.youtube.com/user/LINDAxHELLA
Twitter: https://twitter.com/Luluslife_blog
Instagram: https://www.instagram.com/LulusLifeBeauty/
Facebook: https://www.facebook.com/Lulus-Life-Blog
Pinterest: https://www.pinterest.com/lindaxhella/pins/
Tumblr: http://lindaxwoods.tumblr.com/

Morphe Fluidity Foundation & Concealer Review!

Morphe Fluidity Foundation & Concealer
Fresh Application.

Morphe Fluidity Foundation & Concealer Review!


Hello everyone and welcome back to my website! Today I am reviewing the new Morphe Fluidity Foundation and Concealer! I did an all day wear test and I have photos to share with you, along swatches of the two products. I'm going to go over the claims on their website and tell you how accurate I felt they were. The photo I have here is after I had done my makeup and was in front of a window. It's a bit snowy outside so the lighting was really soft and bright! This was the makeup fresh with about half hour of wear time.


Morphe Fluidity Full-Coverage Foundation
Their Summary:
Finally. A foundation throwing major shade. Meet Morphe Fluidity, the long-wearing, full-coverage matte foundation that performs like a boss and is not caught in the middle or playing sides.

Benefits:
  • 24-hour-long wear
  • Sweatproof, transfer-resistant, water-resistant
  • Free of oils, fragrance, and parabens
  • Great for all skin types
Ingredients:
Cyclopentasiloxane, Water/Aqua/Eau, Isododecane, Methyl Methacrylate Crosspolymer, Butylene Glycol, Mica (CI 77019), Dimethicone, PEG-10 Dimethicone, PEG/PPG-18/18 Dimethicone, Acrylates/Dimethicone Copolymer, Butylene Glycol Cocoate, Silica Silylate, Phenyl Trimethicone, Dimethicone Crosspolymer, Polyglyceryl-3 Diisostearate, Disteardimonium Hectorite, 1,2-Hexane Diol, Polyglyceryl-6 Polyricinoleate, Tocopherol, Triethoxycaprylsilane, Magnesium Sulfate, Cyclohexasiloxane, Ethylhexylglycerin, Propylene Carbonate, Polyhydroxystearic Acid, Hydroxyacetophenone, Caprylhydroxamic Acid, Phenoxyethanol. May Contain: Iron Oxides (CI 77491, CI 77492, CI 77499), Titanium Dioxide (CI 77891)

My Shade: 
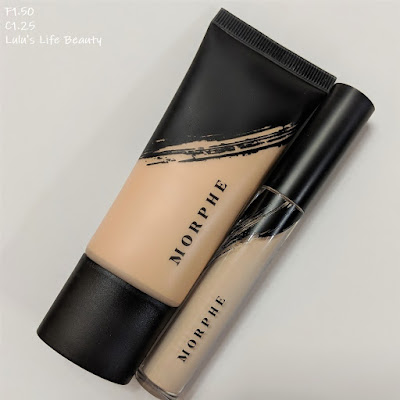
F1.50 Neutral (fair with neutral undertones)

My Thoughts:
Morphe Fluidity Foundation & Concealer
After 6 Hours of Wear.
First impression of the foundation is it has a medium thickness. There isn't much of a scent and appeared to be pretty full coverage. I decided to buff in the foundation with a flat top brush by BH Cosmetics. Using a brush will give you slightly better coverage than a sponge will. Sponge's tend to pick up more of the product, giving you less coverage. Buffed out this foundation is absolutely flawless, and smooth! I have a lot of texture and it seemed to hide a lot of it. A lot of reviews had said it made their texture show up more. I for one, did not have that issue thankful. For my skin type, I have an oily t-zone and dryness on my jaw line and around my acne breakouts. It did a beautiful job hiding my breakouts and redness. By the end of the night, after 6 hrs of wear I looked shiny. But for some reason I wasn't greasy feeling... I just looked shiny, It was more of a glow, not sure if I mind it. One thing to note is the foundation oxidized and did turn a little darker. The foundation is kind of yellow toned and almost turns a little warm once it's actually dried down and set. But it doesn't look orange on the skin. I didn't have any transfer on my clothes or any break up in the formula.


Morphe Fluidity Full-Coverage Concealer

Their Summary:
Show blemishes, imperfections, and under-eye circles who’s the boss babe. You. This creamy AF, full-coverage concealer can multi-task like a mofo. Not only will it leave you with super-blendable concealing power, it brightens and contours like nobody’s business. Game on.

Benefits: 
• 16-hour-long wear
• Sweatproof, transfer-resistant, water-resistant
• Free of fragrance and parabens
• Ophthalmologist tested

Ingredients:
Water/Aqua/Eau, Cyclopentasiloxane, Dimethicone, Cetyl PEG/PPG-10/1 Dimethicone, Methyl Methacrylate Crosspolymer, PEG-10 Dimethicone, Mica, Trimethylsiloxysilicate, Butylene Glycol, Disteardimonium Hectorite, Silica Silylate, Triethoxycaprylylsilicate, Dimethicone/Vinyl Dimethicone Crosspolymer, Cyclohexasiloxane, Butyrospermum Parkii (Shea) Butter, Ethylhexylglycerin, Polyglyceryl-3 Diisostearate, Polyhydroxystearic Acid, Olea Europaea (Olive) Fruit Oil, Sodium Chloride, Phenoxyethanol.  +/- May Contain/Peut Contenir: Titanium Dioxide (CI 77891), Iron Oxides (CI 77491, CI 77492, CI 77499)

My Shade:
C1.25 (Neutral)

My Thoughts:

Morphe Fluidity Foundation & Concealer
F1.50 & C1.25
The texture of this concealer is kind of thick but super creamy and smooth. I thought this concealer was going to be way too light based on the foundation shade, but once everything was blended out and set, it was a perfect match! The concealer slightly oxidized, but not as much as the foundation, which still wasn't very much. I did purchase the lightest neutral foundation and concealer shades, and they're both kind of yellow in tone. Luckily my Italian genes pull slightly yellow, but i'm still more on the neutral side. There wasn't much of a scent, other than the general makeup smell. All cream makeup products have that basic scent, that isn't fragrant. It was definitely full coverage. I have awful dark circles that almost look like bruises, and the concealer covered everything.


Morphe Fluidity Foundation & Concealer
Here you can see them swatched on the back of my hand. The fresh swatch was slightly patted out and as you can see the coverage is still very full. Yes, my hands are very light compared to my face and chest. The swatches of them dried was after 20 minutes and I let them dry naturally. They're not set at all and have no transfer or smearing. They're matte and soft, They don't have a drying feel to them.


Thank you all so much for stopping by and checking out this review. I hope you found it informative, if you have any questions feel free to ask me in the comments or you can always DM me on any of my social media platforms which will all be linked below. If you can't tell, I loved the foundation and concealer! Yes I set them, I used the Makeup Revolution Baking Powder in Translucent. I used a light amount of powder just to make sure nothing creased or got greasy through my t-zone.
Xoxo Lulu


Find me elsewhere:
Youtube: https://www.youtube.com/user/LINDAxHELLA
Twitter: https://twitter.com/Luluslife_blog
Instagram: https://www.instagram.com/LulusLifeBeauty/
Facebook: https://www.facebook.com/Lulus-Life-Blog
Pinterest: https://www.pinterest.com/lindaxhella/pins/
Tumblr: http://lindaxwoods.tumblr.com/

Caperci Angel Wing Heart Pendent Necklace Jewelry Review

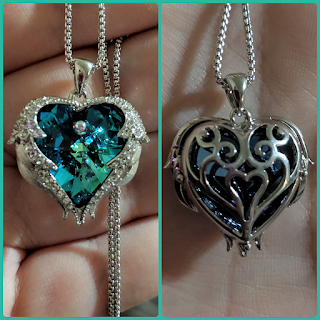
Caperci Angel Wings Sparkling Swarovski Crystal Heart Pendant NecklaceHello everyone and welcome back to my website! Today I have another jewelry review. The lovely brand Caperci reached out to me again wanting to work together. Since I loved the first piece I agreed. They have such beautiful jewelry, if you would like to check out their Amazon Store, Click this link and you can check out their pieces! So many of their pieces are perfect for this up coming Valentine's day!! The necklace I received this time around is the 'Angel Wings' Sparkling Swarovski Crystal Heart Pendant NecklaceHere with a gem that has a blue to green shift, and one with a purple to blue shift! Two other stunning pieces they have are their "I Love You to The Moon and Back Sterling Silver Pendant NecklaceHere in Rose Gold or Silver. The other one is the Sterling Silver Cubic Zirconia and Lab-Created Gemstone Infinity Pendant Necklace in Pink, You can find that Here! It also comes in a blue topaz stone. This is what I got last time and I love it!


Caperci Angel Wings Sparkling Swarovski Crystal Heart Pendant NecklaceCaperci 'Angel Wings' Sparkling Swarovski Crystal Heart Pendant Necklace

Best deal time is Now!

Look how beautiful this Angel wings and Heart pendent necklace is! I received this necklace this time. I love it so much! It's heavy and beautiful! The chain is the perfect length, The stone shines so beautifully in the sunlight! The big blue heart makes the prettiest refraction on the walls. It's absolutely beautiful! Click the link above or the image itself to go strait to the item!

Specification
Pendant size: 0.9x1.0 inches / 2.2 x 2.5 cm
Chain Length: 16+2 inches / 45 +5 cm
Material: Swarovski Elements Crystals
Color: Blue-Green, Purple-blue, White
Metal: White gold-plated
Necklace style: Pendant
Lobster claw clasps


Caperci Sterling Silver Cubic Zirconia and Lab-Created Gemstone Infinity Pendant Necklace

Best deal time is Now!

This is the necklace I received last time! I love it, It's so weighted and pretty. The center stone actually moves as you move and reflects the light so beautifully! It's made with 925 sterling silver. I'm often allergic to most metals and this necklace hasn't caused any sort of irritation or itching. I love it so much and highly recommend. To check things out further, click the link above or click the image!


Specifications:
Metal Type: Sterling Silver
Metal Color: White Gold Plated
Metal Finish: Polished
Stone Type: Lab-Created Blue Topaz / Pink Sapphire
Stone Color: Blue / Pink
Stone Shape: Round
Stone Size: 6.0mm
AAA Cubic Zirconia Frame
Chain Length: 16 in + 2 in
Pendant Size: 1.0 in L x 0.55 in W, Weight: 0.19 oz
Lobster claw clasps


Caperci "I Love You to The Moon and Back" Sterling Silver Pendant Necklace

Best deal time is Now!

This is such a beautiful necklace, it would be perfect for anyone you love in your life. From a spouse, to your child or any friend or family member, this would be a perfect gift! The rose gold tone is beautiful and it also comes in a silver option! There's a link for this necklace above, you can also click the image to go straight to the amazon link!

Specification
Material: 925 Sterling Silver
Metal Color: White Gold or Rose Gold
Necklace style: Pendant
Chain Length: 16'' + 2''
Pendant Width: 0.8'' (2.0 cm)
Lobster claw clasps


Caperci Angel Wings Sparkling Swarovski Crystal Heart Pendant Necklace
Thank you so much for checking out this review! I hope you guys go check out their jewelry, which you can go to Here, or click the link above. I ended up wearing the first necklace for the better part of two days and I'm not allergic to the metal and that makes me so happy! The one I received this time didn't cause an allergic reaction either. I'm so excited I have two beautiful necklaces that I can actually wear! These three necklaces are currently having awesome sales and if you want them before Valentine's day, hop on those deals while they're still available. I for once am so happy I decided to work with this brand, and I'd love if they wanted to work with me again!
Xoxo Lulu


Find me elsewhere:
Youtube: https://www.youtube.com/user/LINDAxHELLA
Twitter: https://twitter.com/Luluslife_blog
Instagram: https://www.instagram.com/LulusLifeBeauty/
Facebook: https://www.facebook.com/Lulus-Life-Blog
Pinterest: https://www.pinterest.com/lindaxhella/pins/
Tumblr: http://lindaxwoods.tumblr.com/

BH Cosmetics Royal Affair Brush Set Review


Hello everyone and welcome back to my website! Today I have for you a review of the beautiful BH Cosmetics Royal Affair Brush Set! I’m going to go over the quality, price, and lots of other information you may need or want before buying them for yourself. I’ll also touch briefly on some issues people are having with shipping, wait time and my personal experience with those subjects.

This brush set includes 10 brushes, 4 face brushed and 6 eye brushes. The handles are plastic with a "Metalized Finish". Basically meaning they have a shiny chrome finish. They are weighted nicely and don't feel cheap at all. I love a good weight behind a brush, it shows they're made well. Here is a list of bullet points about the brushes, from their website with my own points added in as well. One thing I'm actually confused on is their statement "Metalized handles that assists in precise application", The finish has nothing to do with how well the brushes will or wont preform lol.


I've been seeing a lot of drama on their Instagram photo's of people being upset about them being charged double on accident on orders and shipping taking over a month for things to be shipped. Personally, nothing like this had happened to me and when asking a few people who've had these issues, it was during the holiday season when they were getting a lot of orders. I'm assuming it was a computer error and due to high volume of orders, things were a bit late to be shipped. I think anytime someone orders online around the holiday seasons or when there's a big sale (on any website) the should keep into consideration that there's a lot of others shopping too.


Cost:
  • $25.00 regular price
  • On sale for $17.50
  • 10 brushes at $25 is $2.50 a brush
  • Or $1.75 per brush, based on sale price

Their points:
  • Lush bristles create the perfect finish
  • Soft blend of synthetic hairs
  • Metalized handles that assists in precise application
  • Cruelty Free
  • Professional Quality
My Points:
  • Extremely Soft
  • Fairly inexpensive
  • Nicely Weighted
  • 3 Blending Brush Sizes!!!
  • Dense Bristles
  • Zero shedding
  • The Finish has a beautiful Gloss coating
Brush Listing:
  • Tapered Powder Brush
  • Large Chiseled Contour Brush
  • Large Flat Top Buffing Brush
  • Angled Blush Brush
  • Large Crease Blending Brush
  • Tapered Crease Blending Brush
  • Detailing Crease Blending Brush
  • Tapered Concealer Brush
  • Flat Shader Brush
  • Angled Liner Brush


In conclusion, I highly recommend these brushes. The flat top foundation brush works like a dream! All of the brushes are amazing, but I've been looking for a good foundation brush for a while now. They're amazingly soft, have not shed one bit or gotten out of shape. The fat that there's 3 blending brushes is amazing! They are all different sizes, and help you create such a beautiful blend! Right now they are on sale! I got them on sale a long with 3 angled Brush holders in a Faux Leather, Vegan, Marble Pattern. They're really good quality and super pretty. They're normally $6.00 each, but on sale for $4.50 each!

Thank you so much for stopping in a checking out my review. If you enjoyed make sure you leave a comment and have a chat down in the comment section! I've been trying to pump out more and more content each week and I hope you're all enjoying it! I have a new makeup tutorial coming up on Saturday or Sunday! I can't wait to share it with you!
Xoxo Lulu


Find me elsewhere:
Youtubehttps://www.youtube.com/user/LINDAxHELLA
Twitter: https://twitter.com/Luluslife_blog
Instagram: https://www.instagram.com/LulusLifeBeauty/
Facebook: https://www.facebook.com/Lulus-Life-Blog
Pinterest: https://www.pinterest.com/lindaxhella/pins/
Tumblr: http://lindaxwoods.tumblr.com/

Popular Posts