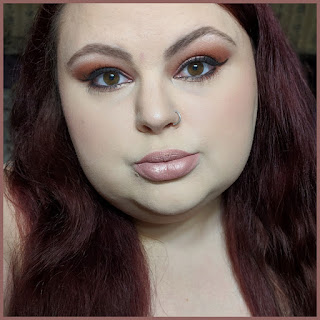
Burnt Orange & Pink Glam
Hello everyone and welcome back to my blog! Today I have for you a warm, smokey simple look. It looks like it's a lot more complicated than it actually is. Don't we all love a simple glam look that looks hard to do than it really is? I know my wings aren't as sharp as a good wing should be. My eyeliner pen is drying out so I had a lot of struggles getting the wing on at all. This look didn't quite look right without a wing, so I had to force the liner pen to work. I messed up the wings and had to fuss with them for a good twenty minutes, lol. Alright, now lets just get into the tutorial before I ramble anymore!

Starting out this makeup look I primed my eyelids with my foundation this time. Last time I used a thin layer of concealer and it worked well. I just felt like being lazy, while also preserving my concealer. Ya girl is broke and has to save money where I can. Starting with shade 1, a soft peach shade, I buffed it all the way from my outer corner almost to the inner corner. I also brought it pretty high up to counteract my hooded lid situation. Next up I took shade 2, a rusty medium brown and brought it through the crease again, a little lower and not as far in. I don't was to close off the eyes and make them look smaller than they already are. Do you see the pattern yet? Each shade I use I keep it a little lower and bring it in a little less to the inner corner. Which is exactly what I did with shade 3, a darker burnt orangey brown. On my lid I used shade 4, a light metallic pink, and I used my finger to press the shade onto my lid for maximum pigment. It turns out super soft and glowey looking. Which is why I brought it into the inner corner and inner third of the lower lash line. The outer two thirds of the bottom lash line is shade 2, the warm medium orangey brown. On my brow bone is my face highlight shade.
Thank you so much for stopping by and checking out this makeup tutorial. I love all of the warm burnt orange tones this time of year and I can't stop using them!! If you enjoyed this look, let me know in the comments down below and don't forget to follow me on instagram to see more of my life and some looks I don't always blog about. I have some that are basic boring looks and i'll share them over there!
Eyes:
Makeup Revolution; The Newtrals 2
Maybelline; Great Lash; Waterproof
Essence Black Pencil Liner
Broadway Beauty Eyebrow Pencil; Brown / Black
BH Cosmetics black pen liner
BH Cosmetics black pen liner
Face:
[My foundations are mixed evenly.]
[My foundations are mixed evenly.]
Maybelline Fit Me Matte + Poreless Foundation; 120
Revlon ColorStay Foundation; 200
Makeup Revolution; Conceal & Define Full Coverage Conceal & Contour, C3
Makeup Revolution; Lace Baking Powder
Elf Contour Kit
Blush; [self made]
Mario Badescu; Facial Spray With Aloe, Herbs and Rosewater
Highlight:
Makeup Revolution; Fierce As Fire, White Highlight Shade
Lips:
J Cat Beauty; Lipfinity Matte Lip Gloss; Champagne Buzz
J Cat Beauty; Lipfinity Matte Lip Gloss; Champagne Buzz
[With the metallic lid shade patted on]
Brushes / Tools:
Real Techniques, Miracle Complexion Sponge
Pueen Large Powder Brush
Pueen Angled Blush Brush
Generic Flat Packing Brush
Generic Brand Fan Brush
Generic Flat Shader Brush
Generic Natural Fiber Blending Brush
Find me elsewhere: Youtube: https://www.youtube.com/user/LINDAxHELLA
Twitter: https://twitter.com/Luluslife_blog
Instagram: https://www.instagram.com/lindaxhella/
Facebook: https://www.facebook.com/Lulus-Life-Blog
Pinterest: https://www.pinterest.com/lindaxhella/pins/
Tumblr: http://lindaxwoods.tumblr.com/


No comments:
Post a Comment