Burnt Orange & Pink Glam

Burnt Orange & Pink Glam

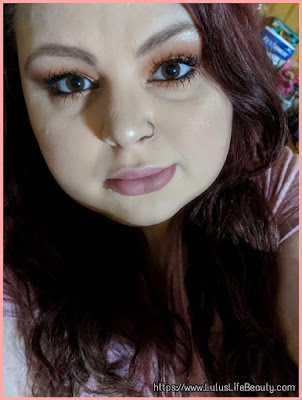
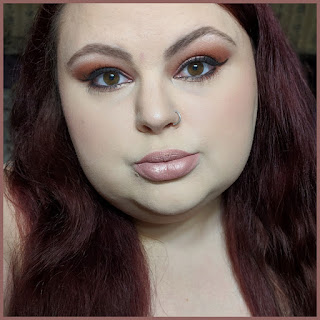
Hello everyone and welcome back to my blog! Today I have for you a warm, smokey simple look. It looks like it's a lot more complicated than it actually is. Don't we all love a simple glam look that looks hard to do than it really is? I know my wings aren't as sharp as a good wing should be. My eyeliner pen is drying out so I had a lot of struggles getting the wing on at all. This look didn't quite look right without a wing, so I had to force the liner pen to work. I messed up the wings and had to fuss with them for a good twenty minutes, lol. Alright, now lets just get into the tutorial before I ramble anymore!


Starting out this makeup look I primed my eyelids with my foundation this time. Last time I used a thin layer of concealer and it worked well. I just felt like being lazy, while also preserving my concealer. Ya girl is broke and has to save money where I can. Starting with shade 1, a soft peach shade, I buffed it all the way from my outer corner almost to the inner corner. I also brought it pretty high up to counteract my hooded lid situation. Next up I took shade 2, a rusty medium brown and brought it through the crease again, a little lower and not as far in. I don't was to close off the eyes and make them look smaller than they already are. Do you see the pattern yet? Each shade I use I keep it a little lower and bring it in a little less to the inner corner. Which is exactly what I did with shade 3, a darker burnt orangey brown. On my lid I used shade 4, a light metallic pink, and I used my finger to press the shade onto my lid for maximum pigment. It turns out super soft and glowey looking. Which is why I brought it into the inner corner and inner third of the lower lash line. The outer two thirds of the bottom lash line is shade 2, the warm medium orangey brown. On my brow bone is my face highlight shade.

Thank you so much for stopping by and checking out this makeup tutorial. I love all of the warm burnt orange tones this time of year and I can't stop using them!! If you enjoyed this look, let me know in the comments down below and don't forget to follow me on instagram to see more of my life and some looks I don't always blog about. I have some that are basic boring looks and i'll share them over there!


Products used:
Eyes:
Makeup Revolution; The Newtrals 2
Maybelline; Great Lash; Waterproof
Essence Black Pencil Liner
Broadway Beauty Eyebrow Pencil; Brown / Black
BH Cosmetics black pen liner

Face:
[My foundations are mixed evenly.]
Maybelline Fit Me Matte + Poreless Foundation; 120
Revlon ColorStay Foundation; 200
Makeup Revolution; Conceal & Define Full Coverage Conceal & Contour, C3
Makeup Revolution; Lace Baking Powder
Elf Contour Kit
Blush; [self made]
Mario Badescu; Facial Spray With Aloe, Herbs and Rosewater

Highlight: 
Makeup Revolution; Fierce As Fire, White Highlight Shade

Lips:
J Cat Beauty; Lipfinity Matte Lip Gloss; Champagne Buzz
[With the metallic lid shade patted on]


Brushes / Tools:
Real Techniques, Miracle Complexion Sponge
Pueen Large Powder Brush
Pueen Angled Blush Brush
Generic Flat Packing Brush
Generic Brand Fan Brush
Generic Flat Shader Brush
Generic Natural Fiber Blending Brush

Find me elsewhere: 
Youtubehttps://www.youtube.com/user/LINDAxHELLA
Twitterhttps://twitter.com/Luluslife_blog 
Instagramhttps://www.instagram.com/lindaxhella/ 
Facebookhttps://www.facebook.com/Lulus-Life-Blog 
Pinteresthttps://www.pinterest.com/lindaxhella/pins/ 
Tumblrhttp://lindaxwoods.tumblr.com/


Cotton Candy Fantasy Tutorial


Cotton Candy Fantasy Tutorial

Hello Everyone and Welcome back to my blog! I've been having so much fun playing with colorful eyeshadows and making myself get out of my comfort zone! I love the colors Pink, Purple and mint, but I didn't have a mint so I used a baby blue. This look reminded me of cotton candy so that's where the name of the tutorial comes from. I couldn't think of anything else to title this tutorial so that's what we have. I can only be creative for so long and for so many things, titling things isn't one of them as it seems, lol. Today I used the BH Cosmetics Take Me Back To Brazil palette that I've had almost a year I think. I've seen pictures of the Morphe x James Charles palette and i'm just craving colorful makeup! I hope i'm able to purchase the palette. But blogging doesn't really make any money for me so I'm extremely lucky to buy anything I can!


Cotton Candy Fantasy Tutorial
Starting out this makeup look, I took my concealer and my beauty sponge and patted it on my lids in a thin layer. I used just enough to hide my veins and discoloration, but I didn't add so much that it was heavy and creasy. I did not set the concealer, I wanted to keep the base tacky to insure the eyeshadows were vibrant and didn't ware away. Picking up color 1, a bright fuchsia / darker hot pink I packed it on the outer corner of the lid making sure to start creating a sharp line. I slowly added more color, lightly blending into the crease and bringing it up pretty high. I then picked up color 2, a darker purple, and patted it on the outer edge blending it into the pink for a soft transition. I also took in onto the outer 2/3 of my bottom lash line. Picking up shade 3, a bubble gum pink, I took it on a blending brush and started buffing out any edges and bringing it close to the head of my brow. I also put it on my blower lash line, fading it from the purple to the inner corner. For the final actual lid shade I picked up shade 4, a light blue with the slightest green tint on a wet brush and patted it onto the lid from inner corner about half way. While I was packing the blue on, I  made sure to softly tap out any edges so it didn't look harsh and sloppy! Shade 5 is basically a sheer highlight shade that has a pinkish gold shift, I used this on a wet brush and  put it in the inner corner and under the arch of my brow bone! This is also what I used to highlight the rest of my face with, on top of another highlight shade!


Cotton Candy Fantasy Tutorial
Here you guys have a close up shot of the eyes with my eyes open and shut so you can see the look in all of its glory! I honestly am in love with this look and i'm super proud of how well it came out! I hope you guys love this look as much as I do. If you recreate it let me know on Instagram! My handle is @LulusLifeBeauty! I have a full list of products, tools and social media links down below. If you would like to support me, please make sure you follow me on Instagram, and share this post on social media!
Xoxo Lulu


Products used:
Eyes:
BH Cosmetics; Take Me Back To Brazil
Maybelline; Great Lash; Waterproof
Essence Black Pencil Liner
Broadway Beauty Eyebrow Pencil; Brown / Black
Duo Eyelash Glue, Clear
Ardell Wispies False Lashes

Face:
[My foundations are mixed evenly.]
Maybelline Fit Me Matte + Poreless Foundation; 120
Revlon ColorStay Foundation; 200
Makeup Revolution; Conceal & Define Full Coverage Conceal & Contour, C3
Makeup Revolution; Lace Baking Powder
Elf Contour Kit
Blush; [self made]
Mario Badescu; Facial Spray With Aloe, Herbs and Rosewater

Lips:
J Cat Beauty; Lipfinity Matte Lip Gloss; Champagne Buzz

Highlight: 
Makeup Revolution; Fierce As Fire, White Highlight Shade

Brushes / Tools:
Real Techniques Sponge
Real Techniques, Miracle Complexion Sponge
Pueen Large Powder Brush
Pueen Angled Blush Brush
Generic Flat Packing Brush
Generic Brand Fan Brush
Generic Flat Shader Brush
Generic Natural Fiber Blending Brush

Find me elsewhere: 
Youtubehttps://www.youtube.com/user/LINDAxHELLA
Twitterhttps://twitter.com/Luluslife_blog 
Instagramhttps://www.instagram.com/lindaxhella/ 
Facebookhttps://www.facebook.com/Lulus-Life-Blog 
Pinteresthttps://www.pinterest.com/lindaxhella/pins/ 
Tumblrhttp://lindaxwoods.tumblr.com/


Autumnal Vibes Makeup Tutorial

Autumnal Vibes Makeup Tutorial
Hello everyone and welcome back to my blog! This past month has been so beautiful, so cool outside. It's been perfect. Although I have been sick off and on a bunch. Recently when I was outside with my dog Chloe I was suddenly really inspired by the trees in my yard to do this look. It ended up super vibrant and beautiful. This is my favorite time of  the year and I can't wait to do so many more autumnal looks. Warm tone smokey is my go-to look all Autumn long! This look kind of ended up really basic looking but it took so long to blend. I have having issues with the base I used and had to redo everything. I then switched the base I used and had so much of an easier time blending! Note to self (and all of you) don't use a heavy concealer as a base! It caused a lot if skipping and patchy-ness. Alright, let's get started boi's!

Starting out this makeup look, I messed up and had to restart. I tried using the Makeup Revolution concealer as a base, but it was either too heavy or i used too much. I ended up using my foundation as a base and things went a lot smoother! This tutorial was done using two palettes, but basically all you need is a shade to set the lid, a few warm and cool brown shades for the crease and a matte or shimmery orange for the lid. To set the lid I went in with shade 1 to create a soft base to blend everything into. Next I  picked up shade 2 which is darker, but still bright yellow and buffed it into the crease. In the picture, shades 3, 4 & 5 look like they are all the same color, but they're actually one gradually darker than the next. Shade 5 is actually a pretty deep brown shade. I took all three of them and buffed them in one at a time, building the intensity. On the lid I mixed shades 6 & 8, 6 wasn't a deep enough orange and 8 was too rusty brown almost. So I mixed and buffed those two together on the lid, blending back into the crease and outer corner area. For shade 7, a really pigmented black, I took the smallest amount and buffed it into the outer corner to bring more depth. You could totally do this look using a lot less colors, But I don't have a very big collection of makeup, so I don't always have the shades I need. I ended up highlighting the arch of the brow bone and inner corner with the highlight I used on my cheeks, it's another makeup revolution palette and its so blinding! Under my lash line I mixed the oranges and the darker brown and black!

Thank you all so much for checking out this post. Please remember to comment and share my posts, it helps me so much! I hope you enjoyed this tutorial and if you did, let me know! I have another tutorial coming on Friday, I really love the look i'm posting today, but Friday's is sparkly and I love glitter! 

Hopefully in these closer up images you can see what I was going for with using all of the colors I had pulled into the look. I wanted a lot of depth and dimension through the crease. There are so many beautiful yellow, orange and red trees outside right now and although I absolutely love it, my sinuses and body hate it. I'm going to try and grind and get some new tutorials going. I can't wait for some fun looks I have planned for the rest of the autumn season and all of winter! 


Products used:
Eyes:
BH Cosmetics; Take Me Back To Brazil
Makeup Revolution; Reloaded Palette; Newtrals 2
Maybelline; Great Lash; Waterproof
Essence Black Pencil Liner
Broadway Beauty Eyebrow Pencil; Brown / Black

Face:
Maybelline Fit Me Matte + Poreless Foundation; 120
Revlon ColorStay Foundation; 200
Makeup Revolution; Conceal & Define Full Coverage Conceal & Contour, C3
Makeup Revolution; Lace Baking Powder
Elf Contour Kit
Blush; [self made]
Mario Badescu; Facial Spray With Aloe, Herbs and Rosewater

Lips:
J Cat Beauty; Lipfinity Matte Lip Gloss; Champagne Buzz

Highlight: 
Makeup Revolution; Fierce As Fire, White Highlight Shade


Brushes / Tools:
Real Techniques Sponge
Real Techniques, Miracle Complexion Sponge
Pueen Large Powder Brush
Pueen Angled Blush Brush
Generic Flat Packing Brush
Generic Brand Fan Brush
Generic Flat Shader Brush
Generic Natural Fiber Blending Brush


Find me elsewhere: 
Youtubehttps://www.youtube.com/user/LINDAxHELLA
Twitterhttps://twitter.com/Luluslife_blog 
Instagramhttps://www.instagram.com/lindaxhella/ 
Facebookhttps://www.facebook.com/Lulus-Life-Blog 
Pinteresthttps://www.pinterest.com/lindaxhella/pins/ 
Tumblrhttp://lindaxwoods.tumblr.com/


Popular Posts