Kiss Salon French Nails; DIY Almond Nails


Lulu's Life Almond Nails
Today I want to share with you my secret to how I get my Kiss brand nails to stay on for four to six weeks! You have to remember, these nails are a commitment. You never force or try to rip off the nails, it will damage your natural nails. Also, they’re really hard to type with when they’re really long. This may not have been the best idea to put these on when I need to be writing, lol. I know you probably wouldn’t think so, but there is a lot you have to consider before doing your nails. Nail brand and the brand of the glue are two big factors. Some nails are really thin and will bend and or snap pretty easily. Also, not all glues are made equally! I’ve tried generic brands of both, and it was just all bad and a waste of money. It really isn’t expensive at all the way I do my nails, compared to going to a salon. I haven’t had my nails professionally done since sophomore homecoming in 2005. I think back then to get a set of acrylics it had cost $35.00. How I do my nails costs a whole $5.00, the pack of nails is $3.00 and the bottle n of glue costs $2.00. That’s a lot better than having to find a nail salon that’s clean, reputable and not going to cost an arm and a leg!


Kiss Brand Products
The Products I use.
The nails I'm using right now are the peach Kiss Salon French Nails in long! They come in a pack of twenty-four, if you're lucky you can get two sets of nails out of the box. The great thing is, it doesn't use a lot of the glue either. The glue I use is Kiss Mega Hold Pink Glue, it’s by far one of the best glues they make. I also use a generic coarse nail file to shape my nails, cuticle trimmers and a multi sided nail file to perfect the shape and soften the edges.


Kiss Salon French Nails
The Preparation work.
There is some prep work you have to do to your natural nails. First, you need to push back and trim your cuticles and any hang nails. If they’re on your nail, then the fake nails wont get a good seal and they will pop off really easily. Second you need to lightly buff the nail surface to create texture for better adherence. Lastly you need to use an acetone nail polish remover to clean any dirt, dusts and oils from your nails to ensure a clean surface for the nails to stick to.


Kiss Mega Hold Pink Nail Glue
The Application process.
The most annoying part of applying fake nails is sorting and matching up the correct nail sizes. The nails can’t be too big and push on the skin or they’ll pop up, and if they’re too small and don’t fit the width of your nail, they’ll pop up really easily as well. Once you have that sorted and figure out which ones fit, you should lay them out in order so you don’t get confused and mix them up. If you have the issue of the nails being a little too wide, you can file the sides a little bit at a time to make them fit correctly. To apply them, I put one drop of glue in the nail, spread it around and place it on my nail. Since I’m using the long length of nail, what I do is use a coarse nail file and shape them in to a cross between an Almond nail and a Stiletto nail. I love the look, it makes my fingers look longer which I honestly need. I sadly have tiny baby hands lol.


Gem 7 Way Nail Buffer
The Finishing Steps.
If you aren’t going to change the shape of the nail then you don’t have to bother filing the shape. But I do suggest softening the edges. I use a multi sided nail file to make sure I’m not going to hurt myself with them. I have done that before and it’s awful, you live and learn. Finally I pick a nail color, I’m obsessed with this light mauve pink color I mixed myself. It’s very soft and natural looking with a satin finish. You usually need to use a few coats of Polish to make sure the color is completely opaque.


Lulu's Life Almond Nails
That’s all I do, you need to make sure you aren’t rough on them of course. Also make sure you aren’t soaking your hands in water too long, that softens the natural nails and will make them pop off. I am so happy to be able to share my tips and tricks with you! I’ve had my nails stay on for six weeks at a time with maybe one or two coming up. All I do is file away the extra glue, clean my nail and reapply! That’s it, it’s really simple actually. Thank yall so much for checking out this post, I appreciate your time!

Xoxo
Lulu.

Makeup Revolution #Slay palette!


Hey guys, so I guess you could say I’ve jumped on the peachy eye shadow band-wagon. Never in my life would I have ever thought I would wear orange eye shadow. Honestly, what is my life these days? I'm almost 28 and I’ve started wearing colors on my eyes I never would have even considered a year ago! So needless to say, I’m going to tell you guys what I did to get this look using the Makeup Revolution #Slay Eye Shadow Pallette! First things first, I am one of those weirdos who does their eye shadow before their face makeup. I always get fallout under my eyes and on the tops of my cheeks. If I do a winged eyeliner, I’ll do it after the rest of my makeup, but before my mascara. Otherwise my lashes get in my way, lol. For a primer, I use the Hard Candy eye shadow primer “Eyes the Limit”. It has a silky creamy texture with a little nude color to it. Now to the fun part, the colors! I recently bought the Makeup Revolution palette called #Slay. It has ten very pigmented shadows in it, only four of them are the matte. That and the fact that there were warm shades in it, is what pulled me in. I love a good satin or shade, but mattes are perfect for transitional shades and more glam looks. Although shimmer and glam go hand in hand lol.

Makeup Revolution #Slay Eye Shadow Pallette
I start out with putting the shade ‘Great’ all over my lids, making sure to put it on while the primer is still tacky. There is a fine shimmer in it, so it helps if the primer still has some stickiness to it. I then put a little of the golden bronze ‘Impress’ on the inner quarter. On the upper part of my lid I put a light wash of ‘Destroy’ and ‘#Slay’ make everything blend out softly. For the crease I tap into the orange ‘Impress’ and ‘Killed It’ for that reddish peachy vibe I’m focusing this look on. I blend until I like the level of hazy soft blending. If the color isn’t as vibrant as I want, I add more and continue blending. The outer corner and into the crease I blend in the color ‘Hit’. If I’m wanting to keep it less smoky, I skip the last step and I’ll maybe add some ‘Queen’ to warm it up even more. Today I am skipping ‘Hit’ and just adding ‘Queen’. Next I use a warm soapy wash cloth and wipe away any fallout, with this palette I haven’t had much at all.

Now time to beat my face. I always make sure I have a freshly washed and moisturized face! I use the Biore charcoal face wash and the Nicel Daily Repair with Vitamin A and Retinol. For primer I use the Elf Mineral Primer in Green to reduce the redness on my cheeks, in the creases my nose and any redness from blemishes. On days I was more of a full coverage look I use my Real Techniques Perfection Complexion sponge damp. For foundation I’m currently using the Cover Girl 3in1, I make sure I blend down the neck. Otherwise you’ll end up with a “mask”, which just isn’t cute lol. I recently purchased two new concealers, the Ulta Full Coverage waterproof concealer in Light Warm, it’s the lightest shade with a yellow undertone. I also got the L.A. Girl HD Pro Concealer in Light Ivory. I’m still testing them both out right now. So far I like the Ulta one for under my eyes and on any spots. But I also like the L.a Girl one for the same things. I just don’t know which I like better as of right now! For setting and caking everything I am in love with the Coty Airspun loose face powder in Neutral Natural, it’s so silky and finely milled. I bronze and pretend to contour with the Wet N Wild Coloricon Contouring Pallet in Dulce De Leche and I use my favorite, yet discontinued Avon blush in Classic aura, it’s a natural tone pinky mauve. I highlight with a highlighter I made myself that’s a soft frosty pink, I’m obsessed with it. To finish up everything I lightly pencil in my brows with the Jordana fabubrow in dark brown, then I brush it through. It is too dark for me so I have to use a light hand with it. For mascara I use the Holy Grail, and always trusty Maybelline The Rocket in Waterproof. After my mascara dries I tight line and line my waterline with Rimmel waterproof sparkling black eyeliner. After that, use a little of the orange ‘Impress’ and ‘Queen’ to lightly smoke out the lash line! I recently bought a J.Cat kissproof liquid lipstick in Champagne Buzz, I love it! It’s very thin and pigmented for being only like four dollars. Right now I don’t have any setting spray, so I use water in a spray bottle to settle down the powders and prevent them from looking cakey. Although it doesn’t do anything but setting everything down, I still use it for now. I need recommendations for a setting spray that won’t break my bank, and that will hold up to sweat lol. If you know of any good ones, hit up the comments section.

Thank you so much for taking the time out of your day to read this. I appreciate every bit of feedback you guys have to offer! I hope you have an amazing day!

Xoxo
Lulu.

How I control my frizzy hair!


Being half Italian, I can honestly say I have struggled with my hair being frizzy and hard to manage. The Internet was never something I thought would be helpful. The last five years of my life I have discovered blogs and YouTube videos that actually had useful information. I never knew there was this sort of community on the Internet. Now that I'm finding my niche in this thing called blogging, I've realized there's a lot of things I could talk about. So let's get right into the basic details! I'm almost 28, I have color damaged hair, and again I'm half Italian. My hair is some what coarse and pretty thin, it just seems thicker than what it actually is. Which isn't always great, considering humidity is my enemy, as is sweating and doing anything that involves either of them.


For shampoo and conditioner I use Aussie Mega Moist, yes I hate that word… Moist… Ew, haha. I buy the huge double pack, with hair down to my butt I go through a lot of soap! It’s also cheaper to buy the bulk size. I’ve been using these for the last couple of months and I have noticed a difference in my hair. It’s much softer and less tangled after I dry it and go to brush it. I always shampoo my scalp really well, massaging with my finger tips. I never use my nails, that causes fine cuts and causes damage. After I shampoo my scalp, I bring the extra soap down the length of my hair and rinse well. When I condition, I focus it from my ears down. If I condition my scalp, oil builds up a lot faster which is strange considering I have naturally dry hair.


After I towel dry my hair is put in some Garnier Fructis Sleek and Shine leave in conditioner. I use about a quarter size amount through my ends what whatever is left on my hands I put on the top of my hair to hold down any frizzy hairs. The brush I use is a basic dollar brush and it works great. Its just like a wet brush, but a cheaper version. I work from my ends and go up to prevent breakage. I already have enough damage and breakage, no sense in causing more when I know how you prevent it. On a weekly basis I try to do a hair mask with organic virgin coconut oil. I will leave it in for about twelve hours or longer if possible. I normally forget to do it weekly if we’re being honest. So in all actuality I do it roughly once or twice a month. When I have done it weekly, I noticed my hair grew like crazy! I always notice my hair feels stronger and I noticeably shinier regardless of how often I do it. Coconut oil is great for frizzy control as well. I use the smallest amount possible to just tame the frizz.

I have cut down straightening or heat processing my hair down to only “special occasions” or if I’m in the mood to have straight hair. That’s about once every two or three months. Taking good care of your hair and using good products will definitely help with frizzy hair. If I’m ever having trouble with more frizz than normal, I put a little hair spray on a comb and comb it down. To straighten my hair I use the Garnier Fructis Flat Iron Protection spray. I find it to be kind of stick, but it smells nice! If you guys know of any that work and aren’t sticky, let me know in the comments! I don’t know if this was helpful at all, but I hope it was. Thanks for taking the time to read this post, I appreciate you.


Xoxo,
Lulu.


Rocvape Origo CVB review!


http://www.rocvape.com/product/origo-cvb/
Recently I had the company Rocvape reach out to me asking if I wanted to review one of their new vape mods! I was honestly so shocked and honored they reached out. Vaping is something I'm passionate about. I’m big on promoting the switch from smoking cigarettes to vaping. Since I made the switch a little over two years ago, this is the best my asthma and breathing has been since I was a kid! I think everyone should know, with my reviews I will always be 100% honest and upfront. Just because I have something sent to me, doesn’t mean I’ll fake anything or lie about my feelings towards something. That being said, They did send me this for review, and I appreciate it so much!

http://www.rocvape.com/product/origo-cvb/
Here’s some specs on the Origo CVB;
4 color options. Black, Pink, Silver & Blue
It’s total weight it only 80g.
All-in-one compact design.
Leak proof built in glass tank.
Built-in 1600 mAh Li-ion battery.
Battery venting on the bottom.
Born for stealth vaping.
About the size of a Zippo lighter.
Drip tip with no spit-back design.
Simple single button use.
Simple and quick charging.
10 second vape capacity.
Constant 18w vape.


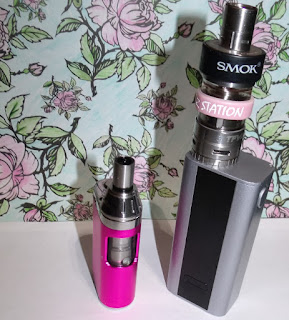
I received the pink Origo CVB on Saturday, March 4th. I've been testing it out since. I filled it up to the fill line and wicked up the coil with some Haze by The Cloud Junkies, which is 80/20 max vg. The coil wicked up super fast, that's what I love to see in a good coil, especially with Max vg juice. Upon first hitting it, I was so surprised at how much Vapor it puts out. I didn’t know what to expect when I got it, but I am so happy with it. Since it only goes to 18w and I’m use to 85w, I didn’t think it would put out as much Vapor as it does. I can use this little guy all day long on one battery charge and I only have to refill it once or twice. I do vape a lot, that’s something to keep in mind. If you’re a vapor who is only vaping occasionally, or even an all day Vapor, this is an awesome option for you. I noticed of I hold the hit in for a few seconds, it hardly puts out a cloud. Stealth vaping, for the win! I love that. Some restaurants do allow vaping, like buffalo wild wings. When I’ve vaped there with my big mod, people would complain just to be rude. But with this little mod, I’m sure I won’t have that problem again!


http://www.rocvape.com/product/origo-cvb/Being female and all, I can actually slip this little guy in my bra without a problem or it falling out. My mod I have now is so heavy I can’t do that. Some women just like to throw things in their bra and go out and about. I am one of those women lol. Also, can we discuss the fact that it comes in Pink!? Thank you for that option! There are very few companies who have a pink color option.

Over all, I love this little stealth vape! It comes in pink, its light weight, hits like a champ and puts off mini clouds. The battery life is great, it last almost all day. For having a built-in tank, it last surprisingly well. I have not had any leaking or spit back, and that’s something I encounter with every other vape I’ve used till now. My honest opinion is that everyone needs one. Next time I’m out and about I’m bring it everywhere with me!


Shout out to Elliot at Rocvape for reaching out to me! Thank you so much for this opportunity, you’re awesome!


Popular Posts