Flirty Fairy Makeup Tutorial
Hello everyone and welcome back to my blog. A few weeks ago I did a Facebook poll on two tutorials I was wanting to do. It was between Mermaid or Fairy. Mermaid had won and that tutorial is up on my blog and on my YouTube. So today I did the fairy look since a lot of people had wanted to see it too. I didn’t film today’s look, I just wasn’t feeling up to filming because I didn’t know how this look would turn out or how I was going to do it. One thing I wish I had to really complete this look, is some glitter. I need to invest in some cosmetic glitters! Hit me up in the comments with some recommendations.
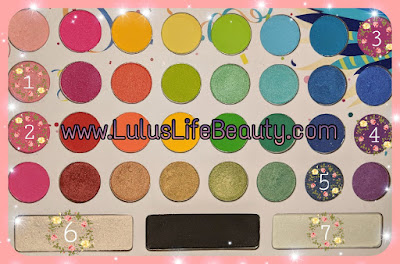
Starting out this look I primed my eye lids with my concealer and went straight in with colors without setting it. I did it this way because I wanted the pinks to pop more than it would, had I set it. This look is using the BH Cosmetics palette, Take Me Back To Brazil. I used two pinks, two purples and a blue. I also used both of the iridescent shadows for brown bone and cheek highlights. With this palette, the shades aren’t named which is so frustrating. I’ll have the photo here numbered to make things easier to follow. Through the whole process of building up color in my crease, I’m avoiding the lid area. I decided to do a cut crease number this week! Going in with the first two pinks, I built them up all the way from inner to outer corner, darkening up the pink slowly. Once I got the pink bright enough, I went in with shades 3 and 4, keeping them in the outer corner. Going back and forth adding a little at a time to blend things evenly. In the very outer corner I took shade 5 and lightly patted some in. On the bottom lash line, I took shades 5, 4 and 2 and blended them out in an ombre. I lastly cut out the lid with concealer and patted on shade 6, bringing it in the inner corner as well.
Starting out this look I primed my eye lids with my concealer and went straight in with colors without setting it. I did it this way because I wanted the pinks to pop more than it would, had I set it. This look is using the BH Cosmetics palette, Take Me Back To Brazil. I used two pinks, two purples and a blue. I also used both of the iridescent shadows for brown bone and cheek highlights. With this palette, the shades aren’t named which is so frustrating. I’ll have the photo here numbered to make things easier to follow. Through the whole process of building up color in my crease, I’m avoiding the lid area. I decided to do a cut crease number this week! Going in with the first two pinks, I built them up all the way from inner to outer corner, darkening up the pink slowly. Once I got the pink bright enough, I went in with shades 3 and 4, keeping them in the outer corner. Going back and forth adding a little at a time to blend things evenly. In the very outer corner I took shade 5 and lightly patted some in. On the bottom lash line, I took shades 5, 4 and 2 and blended them out in an ombre. I lastly cut out the lid with concealer and patted on shade 6, bringing it in the inner corner as well.

Xoxo Lulu
Products used today.
Eyes:
Hard Candy Eyeshadow Primer
BH Cosmetics Take Me Back To Brazil palette
Essence Kajal Eye Pencil, Black
Broadway Color Lengthening Mascara, Black
Broadway Beauty eyebrow pencil, brown / black
Elf Clear Brow Gel
Face:
Maybelline Pore Eraser Primer
Bare Minerals Custom shade Foundation
Makeup Revolution Liquid Highlight, Champagne
Coty Airspun Face Powder, Naturally Neutral
Elf Contour Palette, light
E.L.F. Cosmetics Makeup Mist & Set
Blush, it's one I made myself!
Highlight:
Makeup Revolution Liquid Highlight, Champagne
BH Cosmetics palette Take Me Back To Brazil
Lips:
Makeup Revolution Matte Lipstick, Lust
Brushes / Tools:
Real Techniques Miracle Complexion Sponge
Pueen Large Powder Brush
Pueen Angled Blush Brush
Pueen Flat Shader Brush
Elf Defining Eye Brush
Elf Eyeshadow Brush
Elf Flat Contour Brush
Generic Brand Fan Brush
Generic Blending Brush
Generic Natural Fiber Blending Brush
Socials:
https://beacons.ai/luluslife


