Think Pink Makeup Tutorial

Think Pink Makeup Tutorial


Think Pink Makeup Tutorial
Hello everyone and welcome back to my blog! Today I'm bringing you a beautiful pink and burgundy eyeshadow look i did with one of my new palettes, Makeup Revolution Reloaded Iconic Newtrals 2. I got this about two weeks ago and this is my first tutorial using it. A little review is included in the tutorial along with how to achieve the look! I did end up using a lot more shades than I really needed to, but that was because I did a lot of blending and gradients. By the way, I know my lashes are wonky. They  wouldn't sit right, this is only my second time ever using them though lol. Now let's get into this tutorial.


Think Pink Makeup Tutorial
To prime my eyelids I used my Hard Candy Eyeshadow primer I've used for years, it's so good. I have never had an issue with creasing and I have oily eyelids. I went ahead and numbered the shades since they aren’t named, I find that makes it easier to follow along. To set my lid, I did as I normally do and used shade 1, the light bone shade and put it all over. This look is pretty simple to do, but it uses a lot of shades. In the crease I took shade 2 and brought it from outer corner to about half way in. These shadows are very pigmented, so I only used a little bit of it to create a hazy warm crease. On the eyelids with a packing brush I used shadows marked as 3, 4 & 5 in that order and patted them on my lid from inner corner with the lightest, to the outer corner with the darkest. With a clean blending brush, I went in the crease to soften any of the harsh lines. I also took the same three lid shades and blending them on my bottom lash line. On the very inner corner and brow bone, I used shade 6. That’s all I did to achieve this look and I love it. There’s so pink and burgundy loveliness, it gives me all the feels!


Think Pink Makeup Tutorial

Thank you so much for stopping by to check out this tutorial. I hope you loved it as much as I do! Let me know if you can see a difference in the photo quality and if it’s better or worse. I’m using something different for my photos and I’m not sure if they’re better or worse. All of the makeup products, tools and social media links will be down below! Please feel free to share this with your friends if they’re looking for inspiration.
Xoxo Lulu


Products used today.
Eyes:
Hard Candy Eyeshadow Primer
Makeup Revolution Iconic Newtrals 2
Essence Kajal Eye Pencil, Black
Broadway Color Lengthening Mascara, Black
Elf  Eye Brow Kit, Light
Elf Clear Brow Gel
Ardell Wispies Lashes

Face:
Dermacol Foundation Cover, 210
Maybelline Matte n Poreless Foundation, Porcelain
Coty Airspun Face Powder, Naturally Neutral
Elf Contour Palette, light
E.L.F. Cosmetics Makeup Mist & Set
Blush, it's one I made myself!

Highlight:
Revolution Liquid Highlight, Champagne

Lips:
Makeup Revolution, Iconic Matte Nude, Lust
(Shade “3” in eyeshadow palette patted on top)

Brushes / Tools:
Real Techniques Miracle Complexion Sponge
Pueen Large Powder Brush
Pueen Angled Blush Brush
Pueen Flat Shader Brush
Elf Defining Eye Brush
Elf Eyeshadow Brush
Elf Flat Contour Brush
Generic Brand Fan Brush
Generic Blending Brush
Generic Natural Fiber Blending Brush

Find me elsewhere:
Youtube: https://www.youtube.com/user/LINDAxHELLA
Twitter: https://twitter.com/Luluslife_blog
Instagram: https://www.instagram.com/lindaxhella/
Facebook: https://www.facebook.com/Lulus-Life-Blog
Pinterest: https://www.pinterest.com/lindaxhella/pins/
Tumblr: http://lindaxwoods.tumblr.com/


Sunrise Makeup Tutorial

Sunrise Makeup Tutorial 


Sunrise Makeup Tutorial Hello everyone and welcome back to my blog! I was recently able to purchase some new makeup items. I purchased two eyeshadow palettes, the Makeup Revolution The Newtrals 2 and the BH Cosmetics Take Me Back To Brazil palette! The BH Cosmetics palette is all crazy bright colors, colors I did not have. First thing I did was create a look I’ve always wanted to try, a Sunrise makeup tutorial! I am in love with this look and so excited to be sharing it with you!

Sunrise Makeup Tutorial
Starting out this look I used my favorite eyeshadow primer from Hard Candy and set it with the wet n wild single shadow in BrulĂ©. This look involves a lot of layering and blending out the shades. Since none of them are named it makes it a little harder to be as concise as I would like. I did however make sure I had a photo of the palette with the shades circled and numbered. I worked from lightest to darkest, bringing each shadow a little lower. Starting out with the light yellow, I put it in and above my crease to compensate for my hooded eyes. I took the shadows from outer corner almost all the way in. Next I went in with the brighter yellow shade blending it slightly lower and building up the brightness. Next up I took the bright orange and put it through my crease and then took the darker orange bringing it a little lower. For the outer corner and slightly into the crease, I used the deep brick color to help with dimension. On the lid I used a bright fuchsia purple patting it from inner corner to the edge of the brick shade, blending them at the line. On my brow bone I took the iridescent white with a pink shift to it. I would have used the other one with the blue / green shift, but it didn’t seem to fit the look, lol. On my lower lash line I used brick, bright orange and light yellow and ombre’d them out!


Sunrise Makeup Tutorial Thank you so much for checking out this tutorial! I used so many new products today and I’ll have them all down below as I always do! I hope you enjoyed this tutorial and if you did, let me know down below! If you would like reviews of any of the items I have listed below, just let me know and I’ll do as many as I can! Everything with a * is new!
Xoxo Lulu


Products used today.
Eyes:
Hard Candy Eyeshadow Primer
*BH Cosmetics Take Me Back To Brazil palette
*Essence Kajal Eye Pencil, Black
Broadway Color Lengthening Mascara, Black
Elf  Eye Brow Kit, Light
*Elf Clear Brow Gel
Ulta Beauty Classic Felt Tip Liner
*Ardell Wispies Lashes

Face:
Revlon Colorstay Foundation, 200
Maybelline Matte n Poreless Foundation, Porcelain
Coty Airspun Face Powder, Naturally Neutral
*Elf Contour Palette, light
E.L.F. Cosmetics Makeup Mist & Set
Blush, it's one I made myself!

Highlight:
*Makeup Revolution Liquid Highlight, Champagne

Lips:
*Makeup Revolution, Iconic Matte Nude, Lust

Brushes / Tools:
Real Techniques Miracle Complexion Sponge
Pueen Large Powder Brush
Pueen Angled Blush Brush
Pueen Flat Shader Brush
Elf Defining Eye Brush
Elf Eyeshadow Brush
Elf Flat Contour Brush
Generic Brand Fan Brush
Generic Blending Brush
Generic Natural Fiber Blending Brush

Find me elsewhere:
Youtube: https://www.youtube.com/user/LINDAxHELLA
Twitter: https://twitter.com/Luluslife_blog
Instagram: https://www.instagram.com/lindaxhella/
Facebook: https://www.facebook.com/Lulus-Life-Blog
Pinterest: https://www.pinterest.com/lindaxhella/pins/
Tumblr: http://lindaxwoods.tumblr.com/


Valentine's Makeup Tutorial

Valentine's Makeup Tutorial 


Hello everyone and welcome back to my blog! Today’s makeup tutorial is how I wore my makeup for Valentine’s day this year! It’s s simple look and really easy to do, but it just looks so beautiful. Everything used in today’s tutorial is either drug store or from Ulta, at drugstore priced items. Speaking of Ulta, I have an order coming in including two new eyeshadow palettes and I’m really excited to create some new looks with them. Spoiler, I got the BH Cosmetics Take Me Back To Brazil palette. I don’t use a lot of bright colors like that, because I don’t own any. So I’m very excited to try some new things!


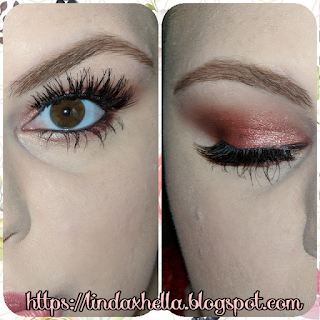
I primed my eyelids with my Ulta concealer and set it with the bone shade to soften everything. Today’s look is using the Carli Bybel palette, the original one. I’m pretty sure the four eyeshadows I used are also in the Deluxe Edition as well. Yes, the whole look only uses four shadows! To start out the crease I went in with the light cool plum shade and brought it from outer corner to two thirds of the way in. Next I used the darker warm plum shade in the outer corner for added depth. With a flat shader brush I took concealer and cut my lid giving it a sticky base for the shimmery lid. Pack on the concealer I used the soft peachy pink that has a yellow / gold shift. I gently patted back and forth with the lid shade and outer corner shade to create a soft blended transition. Under my lash line I swept the three main eyeshadows in a gradient, lightest shade on the inner corner, if course.


For the rest of the makeup look I added a wing and finished my face makeup and all of my products used will be down below as usual! I hope you enjoyed this makeup tutorial. I thought it was perfect for Valentine’s day since it was pinky and purple and light. Thank you so much for checking out this tutorial! Please let me know what you think down below, down there you’ll also find all of my social media links!
Xoxo Lulu

Products used today.
Eyes:
Ulta Full Coverage Waterproof concealer, light
Carli Bybel palette
Rimmel Scandaleyes Waterproof, Shimmering Black Liner
Broadway Color Lengthening Mascara, Black
Broadway Beauty Eyebrow pencil, Black / Brown
Ulta Beauty Classic Felt Tip Liner

Face:
Maybelline Baby Skin Poreless Primer
Revlon Colorstay Foundation, 200
Maybelline Matte n Poreless Foundation, Porcelain
Coty Airspun Face Powder, Naturally Neutral
NYC Bronzer, Sunny
E.L.F. Cosmetics Makeup Mist & Set
Blush, it's one I made myself!
Highlight, BH Cosmetics Carli Bybel palette (light nude shade)

Lips:
J.Cat Beauty Lipfinity' Matte Kissproof Lip, Champagne Buzz

Brushes / Tools:
Real Techniques Miracle Complexion Sponge
Pueen Large Powder Brush
Pueen Angled Blush Brush
Pueen Flat Shader Brush
Elf Defining Eye Brush
Generic Flat Packing Brush
Generic Brand Fan Brush
Generic Blending Brush
Generic Natural Fiber Blending Brush

Find me elsewhere:
Youtube: https://www.youtube.com/user/LINDAxHELLA
Twitter: https://twitter.com/Luluslife_blog
Instagram: https://www.instagram.com/lindaxhella/
Facebook: https://www.facebook.com/Lulus-Life-Blog
Pinterest: https://www.pinterest.com/lindaxhella/pins/
Tumblr: http://lindaxwoods.tumblr.com/


Remay Shave Gel Bar Review

Remay Shave Gel Bar; Meet your Razors new bff!

REMAY Shave Gel Bars
Hello everyone and welcome back to my blog! Today I am reviewing the Remay Shave Gel Bars! I was contacted a few weeks ago about doing a review for these and I was so intrigued at the thought of a shaving cream in a gel bar form. I’m the type of person who hates having body hair. I’ve been shaving my arms since I was around fifteen and I’ve always had stubble the next day on my arms, legs, arm pits even. No matter the razor I’ve used, it’s always been a thing that happens. Now with this review, there a few topic points I was to talk about! In This review I’m going talk over Packaging, Scent, Texture, Ease of Use, Price and how I liked it overall.

Upon receiving the package, I was really pleased with the product packaging. It’s simple and cute, it would definitely catch my attention in a store. The packaging of the bar it’s self is nice and sturdy, and I appreciate that it has a cap. It means it won't dissolve and go to waste in the shower like bars of soap do. Also, there are grooves on the sides which makes it easier to hold in the bath or shower.


REMAY Shave Gel Bars
The scent is very light and soothing. It almost reminds me of a men’s body wash without the crazy strong scent. I really like how it smells, especially with my hubby out of town driving truck. It kind of smells like him, it’s a relaxing scent!

The texture of the soap is very silky and glides really easily over your skin. It doesn’t have a residue feel to it like I normally get with other soaps. It says it’s Paraben / Sulfate free, I’m guessing that’s why It doesn’t leave residue. It claims on the packaging that it leaves added moisture and I have to agree. It says it has Tea Tree oil and Activated Crystals. My skin is normally very dry and after using this in the bath, my skin wasn’t dry and itchy like normal.


REMAY Shave Gel BarsFor ease of use, it doesn’t get much simpler than this. All you do is pop off the cap and rub it on your legs or arms, where ever your shaving, and it glides on leaving a thin layer of soap for your razor to glide over. If you use only a little water you can create a lather for a foamier shave.

The pricing is $24.99 for a pack of two. I think this is a great price for value, they do what they claim on the website and package and they’re travel friendly. If you’re planning a trip, I’d highly recommended these!

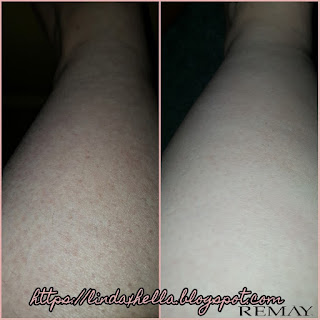
It has been 48 hours since I shaved my legs and I don’t have stubble yet, that’s a new record for me. That shows how close of a shave I was able to get with these. Like I said, I normally have stubble in less than a day. I didn’t use any sort of special razor either. I used a men’s four blade which I had used a few times prior to using the Remay Shave Gel Bar.

Thank you so much for stopping by today! Just for you guys, I have a coupon code and a link for you to use to buy them for yourself! At checkout use code LINDA20 and save 20% off your purchase! Here’s my link to the product if you choose to buy them! Buy Remay Shave Gel Bars!
Xoxo Lulu

Additional information!

The Company: REMAY Shave Gel Bars
Who are we? A company with a mission to make shaving quicker and more enjoyable
How do we do it? With REMAY Shave Gel Bars; a shave gel bar designed with peoples lifestyle in mind

The Product
The shave gel bars protect the skin from nicks, bumps and razor burn
The shave gel bars allows for a quick application with no mess
The shave gel bars contain real coconut and tea-tree oil
The shave gel bars are paraben-free and sulfate-free
The packaging is recyclable
The shave gel bars are vegan and cruelty-free
The shave gel bars work with any 3, 4 or 5 blade razor

Find me elsewhere:
Youtube: https://www.youtube.com/user/LINDAxHELLA
Twitter: https://twitter.com/Luluslife_blog
Instagram: https://www.instagram.com/lindaxhella/
Facebook: https://www.facebook.com/Lulus-Life-Blog
Pinterest: https://www.pinterest.com/lindaxhella/pins/
Tumblr: http://lindaxwoods.tumblr.com/


L'Oreal Paris EverPure Shampoo & Hair Sheet Mask Review

L'Oreal Paris EverPure Repair & Defend Shampoo 

L'Oreal Ever Pure Intense Repair Hair Sheet Steam Mask


Hello everyone and welcome back to my blog! Today I am reviewing a shampoo and hair sheet mask I received from Influenster! This voxbox I received, is my first box. I am so excited to have been one of the people chosen! I received the package in less than a week from when I first got my email telling me I was getting it! It came so fast, I was so excited! Inside the box was the Shampoo and a hair hheet mask. The shampoo is a full size 8.5 oz bottle and the hair mask is a single use hair cap with the product inside.
In the shower I wet my hair as usual, as one does in the shower... The scent is i'm guessing Goji berry, I've never smelled a Goji berry, But I love the scent, It's not over powering, but it has a scent. I used roughly a silver dollar sized squeeze in my hand and lathered it up all through my hair. I only used that much, because if you didn't know, my hair goes almost to the top of my butt, it's very long and a big problem in general lol. I have heard in the past that Sulfate and Paraben Free Shampoo's don't lather very well. I was pleasantly surprised at how sudsy and soft the shampoo felt. It almost felt like the shampoo was making my hair softer just lathering it in. As I was rinsing it out, my hair felt so soft, I'm not use to that at all. I'm not saying any of this because I was sent this for review, This is my genuine opinion on the shampoo after my first use. Normally I use the Aussi Mega Moist shampoo and conditioner, It makes my hair feel clean and smell nice, But it doesn't make my hair feel soft as I'm rinsing. My hair is damaged and generally feels rough and very hard to brush. Just a tip, You need less shampoo than you think!


After rinsing I squeezed some of the water out of my hair and stuck in the hair cap containing the hair mask treatment. I lathered it in all over my hair and used the tape strip to make sure it stayed on and didn't slip. It say it contains  Camellia flower, So I'm guessing that's what the scent it. I really like it. The packet says to leave it on your head around five minutes. I did as it said, always follow directions, kids. Upon rinsing out my hair it had felt even more soft than it did rinsing out the shampoo. I honestly didn't expect to feel a difference in my hair. I could feel the difference and I love it.

My final thoughts on both of these items is that I love them. Normally I don't care about shapoos and conditioners, But trying one that actually made a differance in my hair has changed my mind. I'm going to purchase these products myself. The shampoo is going to last a while, but they make a matching conditiner and leave in mask I want to get. I really enjoyed both of these products. My hair is Softer, Shiner and stronger. It normally takes me over 20 minutes just to brush my hair, today it literally took a minute! What!??!!! I was honestly shocked lol. Below i'm going to have some information on both of the products, links where you can find them, and my social media links!!
Xoxo, Lulu.


EverPure Repair & Defend Shampoo with goji makes hair 3X stronger as it defends against damage and daily color aggressors. UV rays, water and heat styling can sensitize hair and affect your color. Color-treated hair requires special care. Our shampoo is especially gentle on color. There are no harsh sulfates, salts or surfactants that can strip, dull and damage hair. Experience a purely sensorial lush, luxurious lather and a fresh aromatic fragrance that blooms. Ever, our original 100% sulfate-free haircare. Pure respect for your hair.

*System of shampoo, mask, and EverStrong leave-in treatment vs non-conditioning shampoo.

Apply to wet hair and massage gently into a thick lather. Rinse thoroughly. Follow with EverPure Repair & Defend conditioner. For extra care, use EverPure Repair Remedy Balm.
  • Hair Type: All Hair Types
  • Used For: basic cleansing, damage repair 
EverPure Intense Repair Hair Sheet Mask with Camellia flower is a hair treatment that envelops hair in a delicate layer of repairing cream. Shower steam allows for formula to melt onto hair for strengthened, protected locks.100% Sulfate Free, Paraben Free, No Harsh Salts, Dye Free, & Vegan*

*No animal derived ingredients or by-products. Formula not tested on animals.

Step 1: Before getting in the shower, open the packet and unfold sheet mask.
Step 2: Shampoo hair and rinse.
Step 3: After shampooing, twist and wrap hair fully into the cap with flap facing forward. Place sticker to seal.
Step 4: Gently massage cap so hair is coated. Leave on for 5 minutes.
Step 5: Remove mask and rinse.
  • Hair Type: All Hair Types
  • Used For: basic conditioning, damage repair
  • Product Form: Gel
  • Health Facts: Sulfate-free, paraben-free


I received these products complimentary from Influenster for testing purposes.

Find me elsewhere:
Youtube: https://www.youtube.com/user/LINDAxHELLA
Twitter: https://twitter.com/Luluslife_blog
Instagram: https://www.instagram.com/lindaxhella/
Facebook: https://www.facebook.com/Lulus-Life-Blog
Pinterest: https://www.pinterest.com/lindaxhella/pins/
Tumblr: http://lindaxwoods.tumblr.com/

Popular Posts